
How to create your PolyGrants account: a visual step by step guide

Creating your account takes about five minutes. Before you start, find your passport or your national identity document, because the name you type has to match it letter for letter.
This guide walks you through every screen you will see, in the order you will see them, with a picture of each one. Under every picture you will find exactly what to put in each field.
Applying is 100% free. You pay only if you decide to accept an offer. Nothing on the road you are about to walk will ask you for money.
What you need before you open the form
Four things, and you probably have three of them already.
- Your passport or national identity document. Your name, your date of birth and your nationality must match it exactly.
- A phone number that works on WhatsApp. This is the only channel for your second code, so a number without WhatsApp will leave you stuck at the last step.
- An email address you will still be reading in a year. Every decision about your application arrives there.
- About five minutes. Your answers stay on your own device until the very last step, so you can close the tab and come back without losing them.
First screen: can you apply at all?
Before the form opens, four questions decide whether this is your year. There is no account yet, nothing to pay, and no obligation to continue.
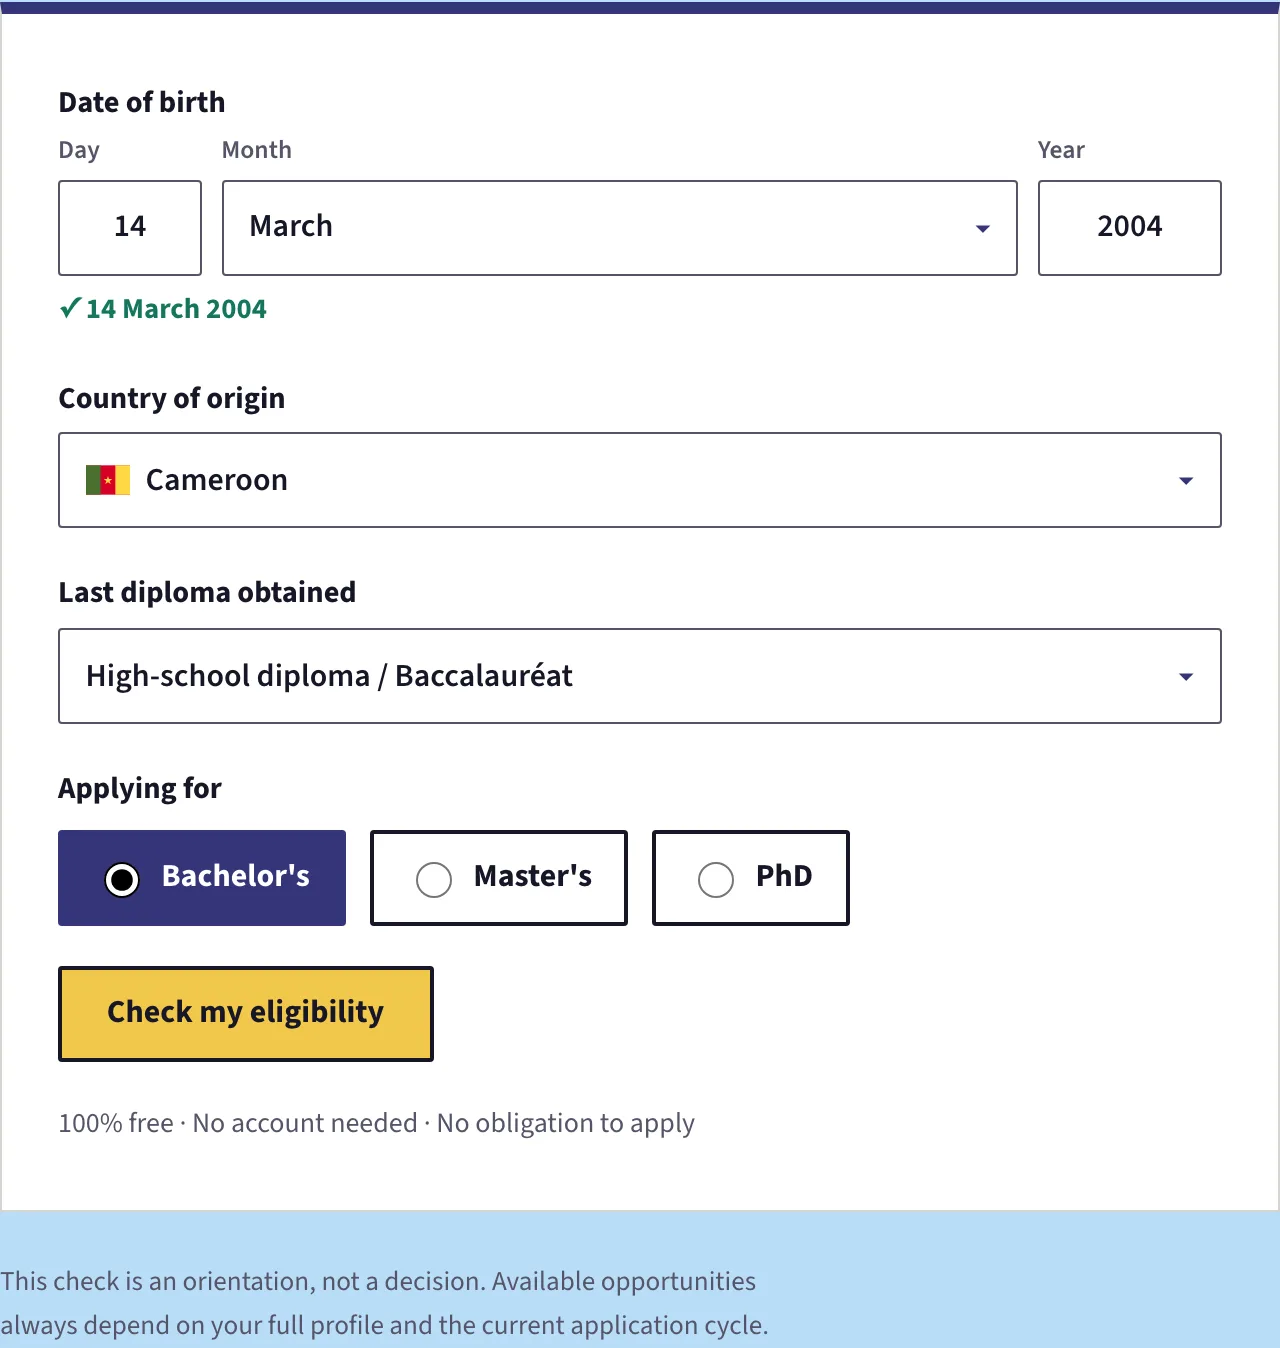
Work through the four fields in order. Enter your date of birth, choose your country of origin, choose the last diploma you actually hold, and tap the level you want to apply for.
One warning about the diploma. Choose the one you have finished, or are finishing right now, not the one you hope to start. The check compares your diploma with the level you chose, and a mismatch will point you at a different level instead of opening the form.
Age matters here too. The limits are 25 for a Bachelor's, 35 for a Master's and 40 for a PhD, counted at the moment you apply.
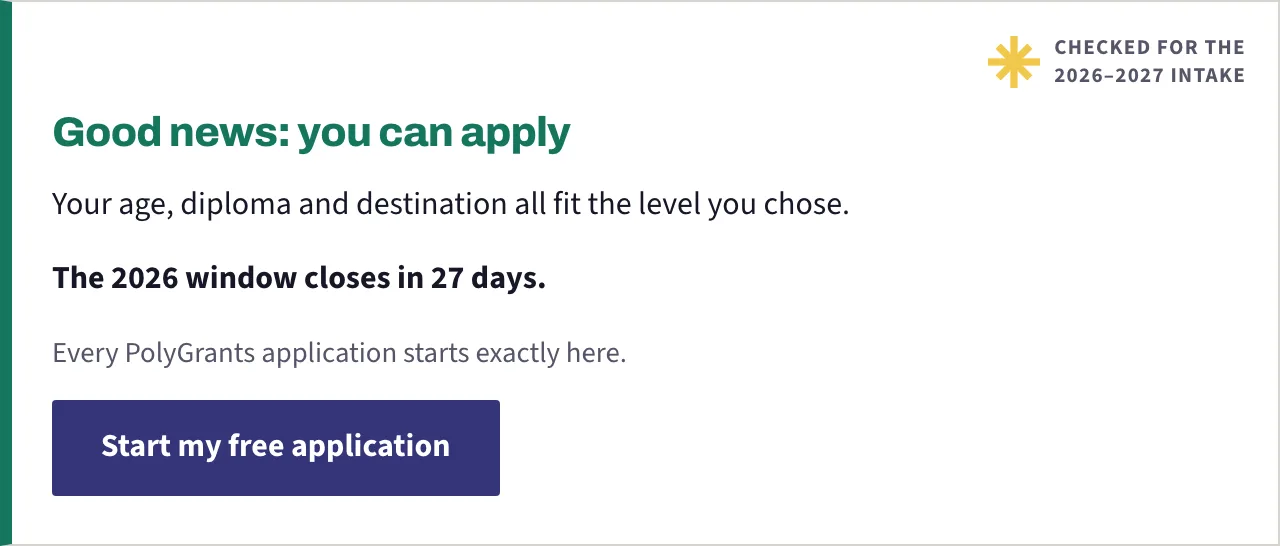
Tap the button on the green panel and the real form opens. If your panel is yellow, read it: it usually means another level fits you better. If it is red, it will point you at an adviser rather than at a dead end.
Step 1 of 5: email, phone and password
Three fields, and each one hides a trap worth knowing about.
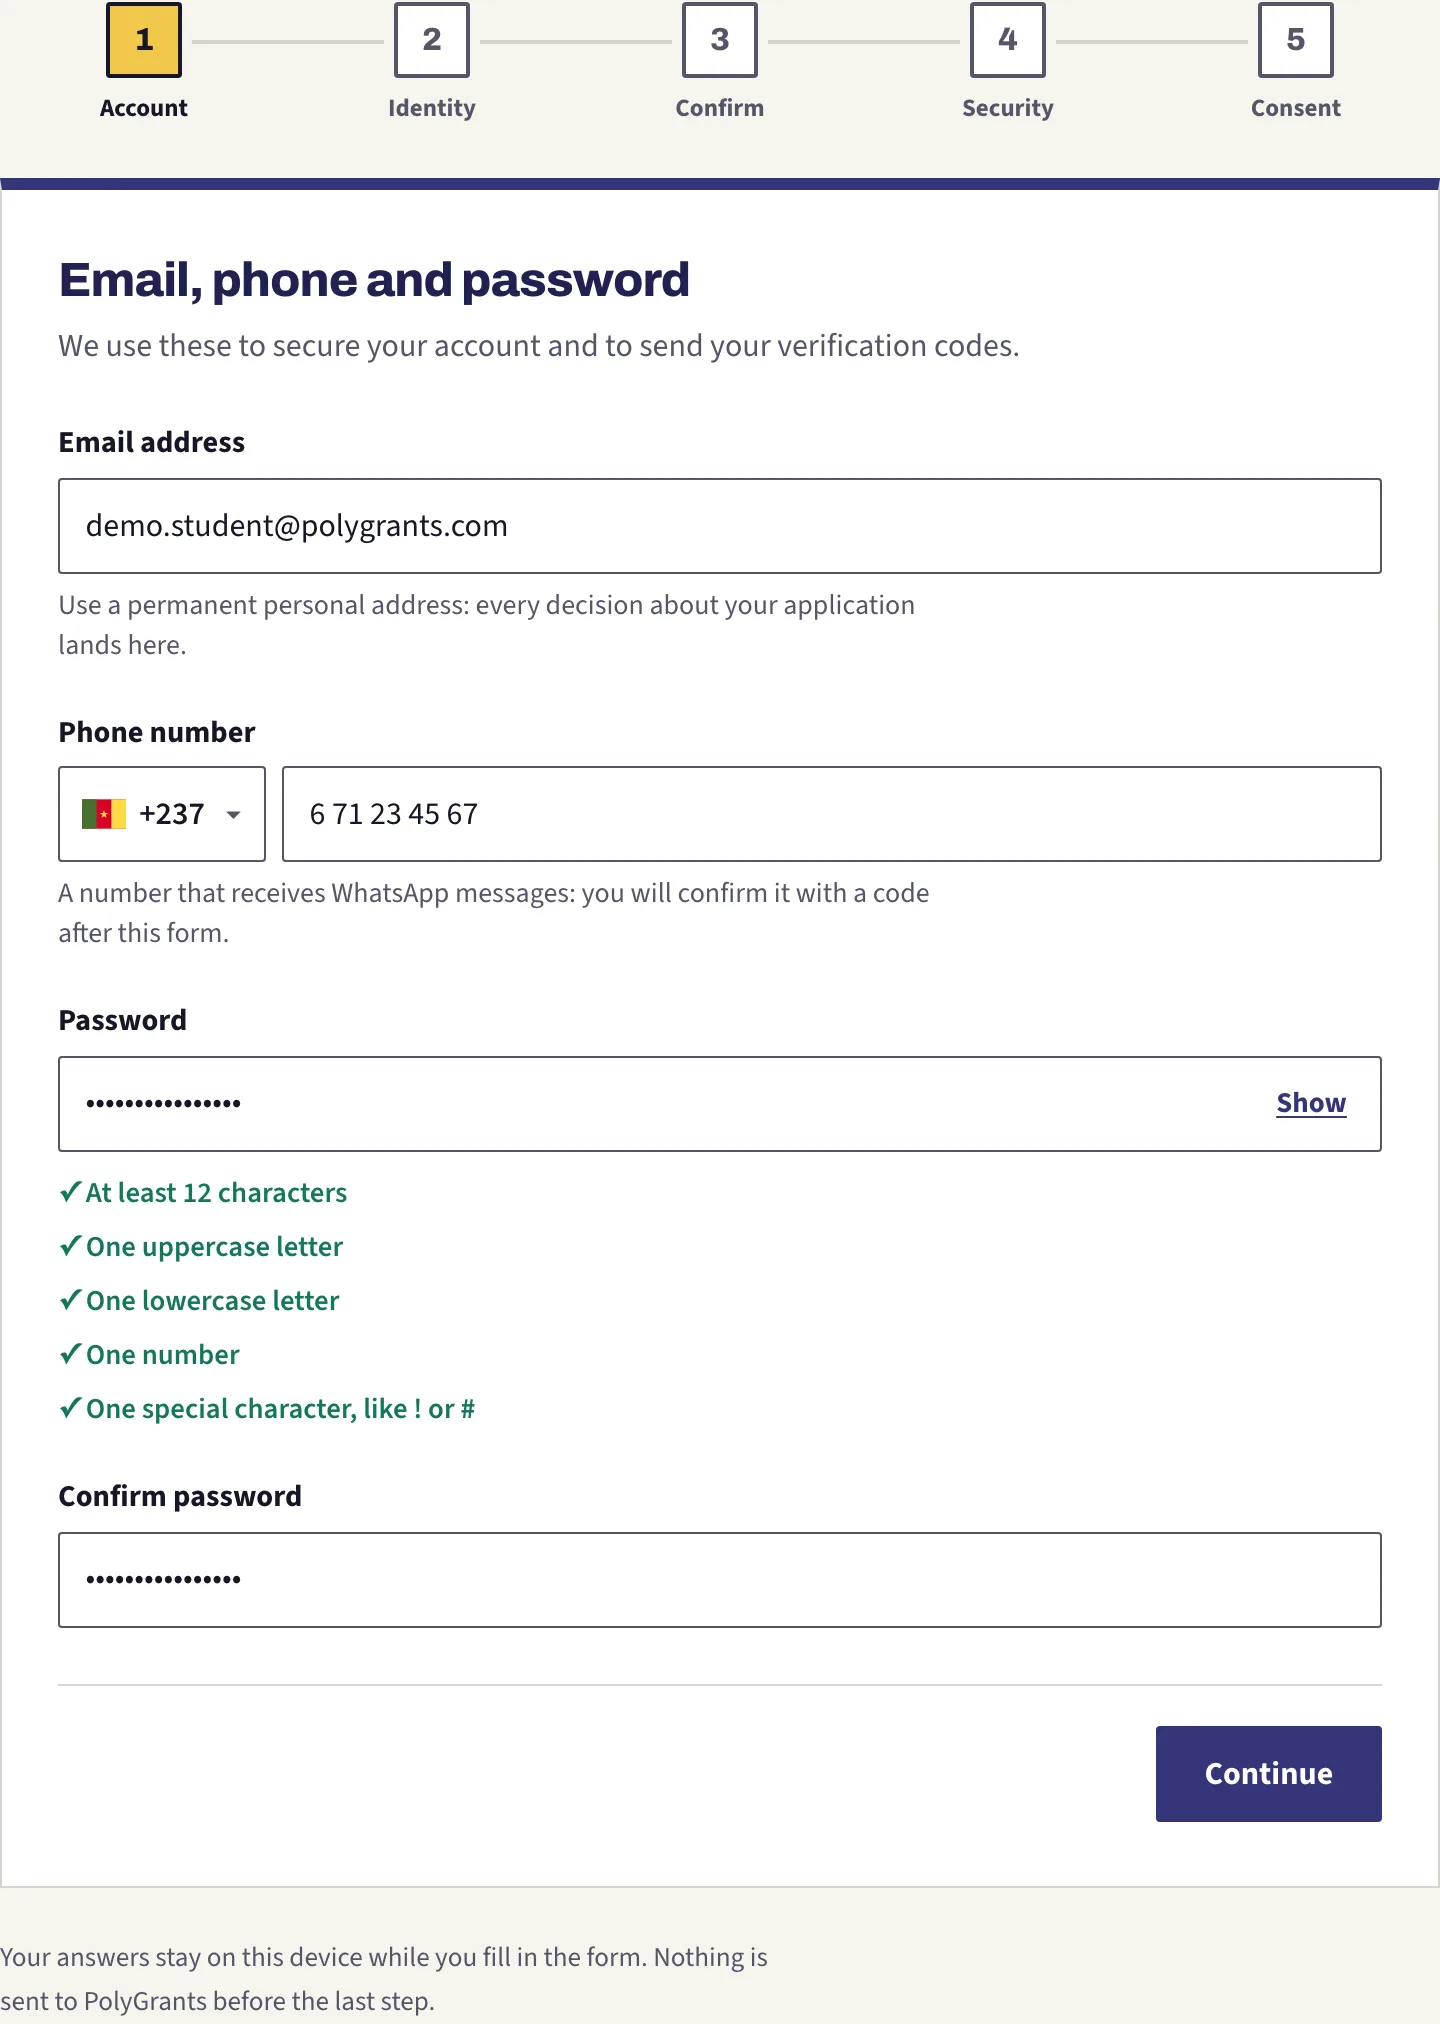
For the email, use a real, permanent, personal address. Relay and temporary addresses are refused, and that includes Apple's Hide My Email as well as the usual disposable-mail services. If your address comes back rejected, this is almost always why.
For the phone, first pick your country from the small flag menu, then type the rest of the number without the country code. The grey text inside the field is an example of what a valid number looks like where you live. Use a number that receives WhatsApp.
For the password, five rules must all turn green: twelve characters, one capital letter, one small letter, one number, and one special character such as ! or #. Type the same password again underneath.
Step 2 of 5: your identity, letter for letter
This is the passport screen. Everything you type here goes onto official applications later, so copy it from the document in front of you rather than from memory.
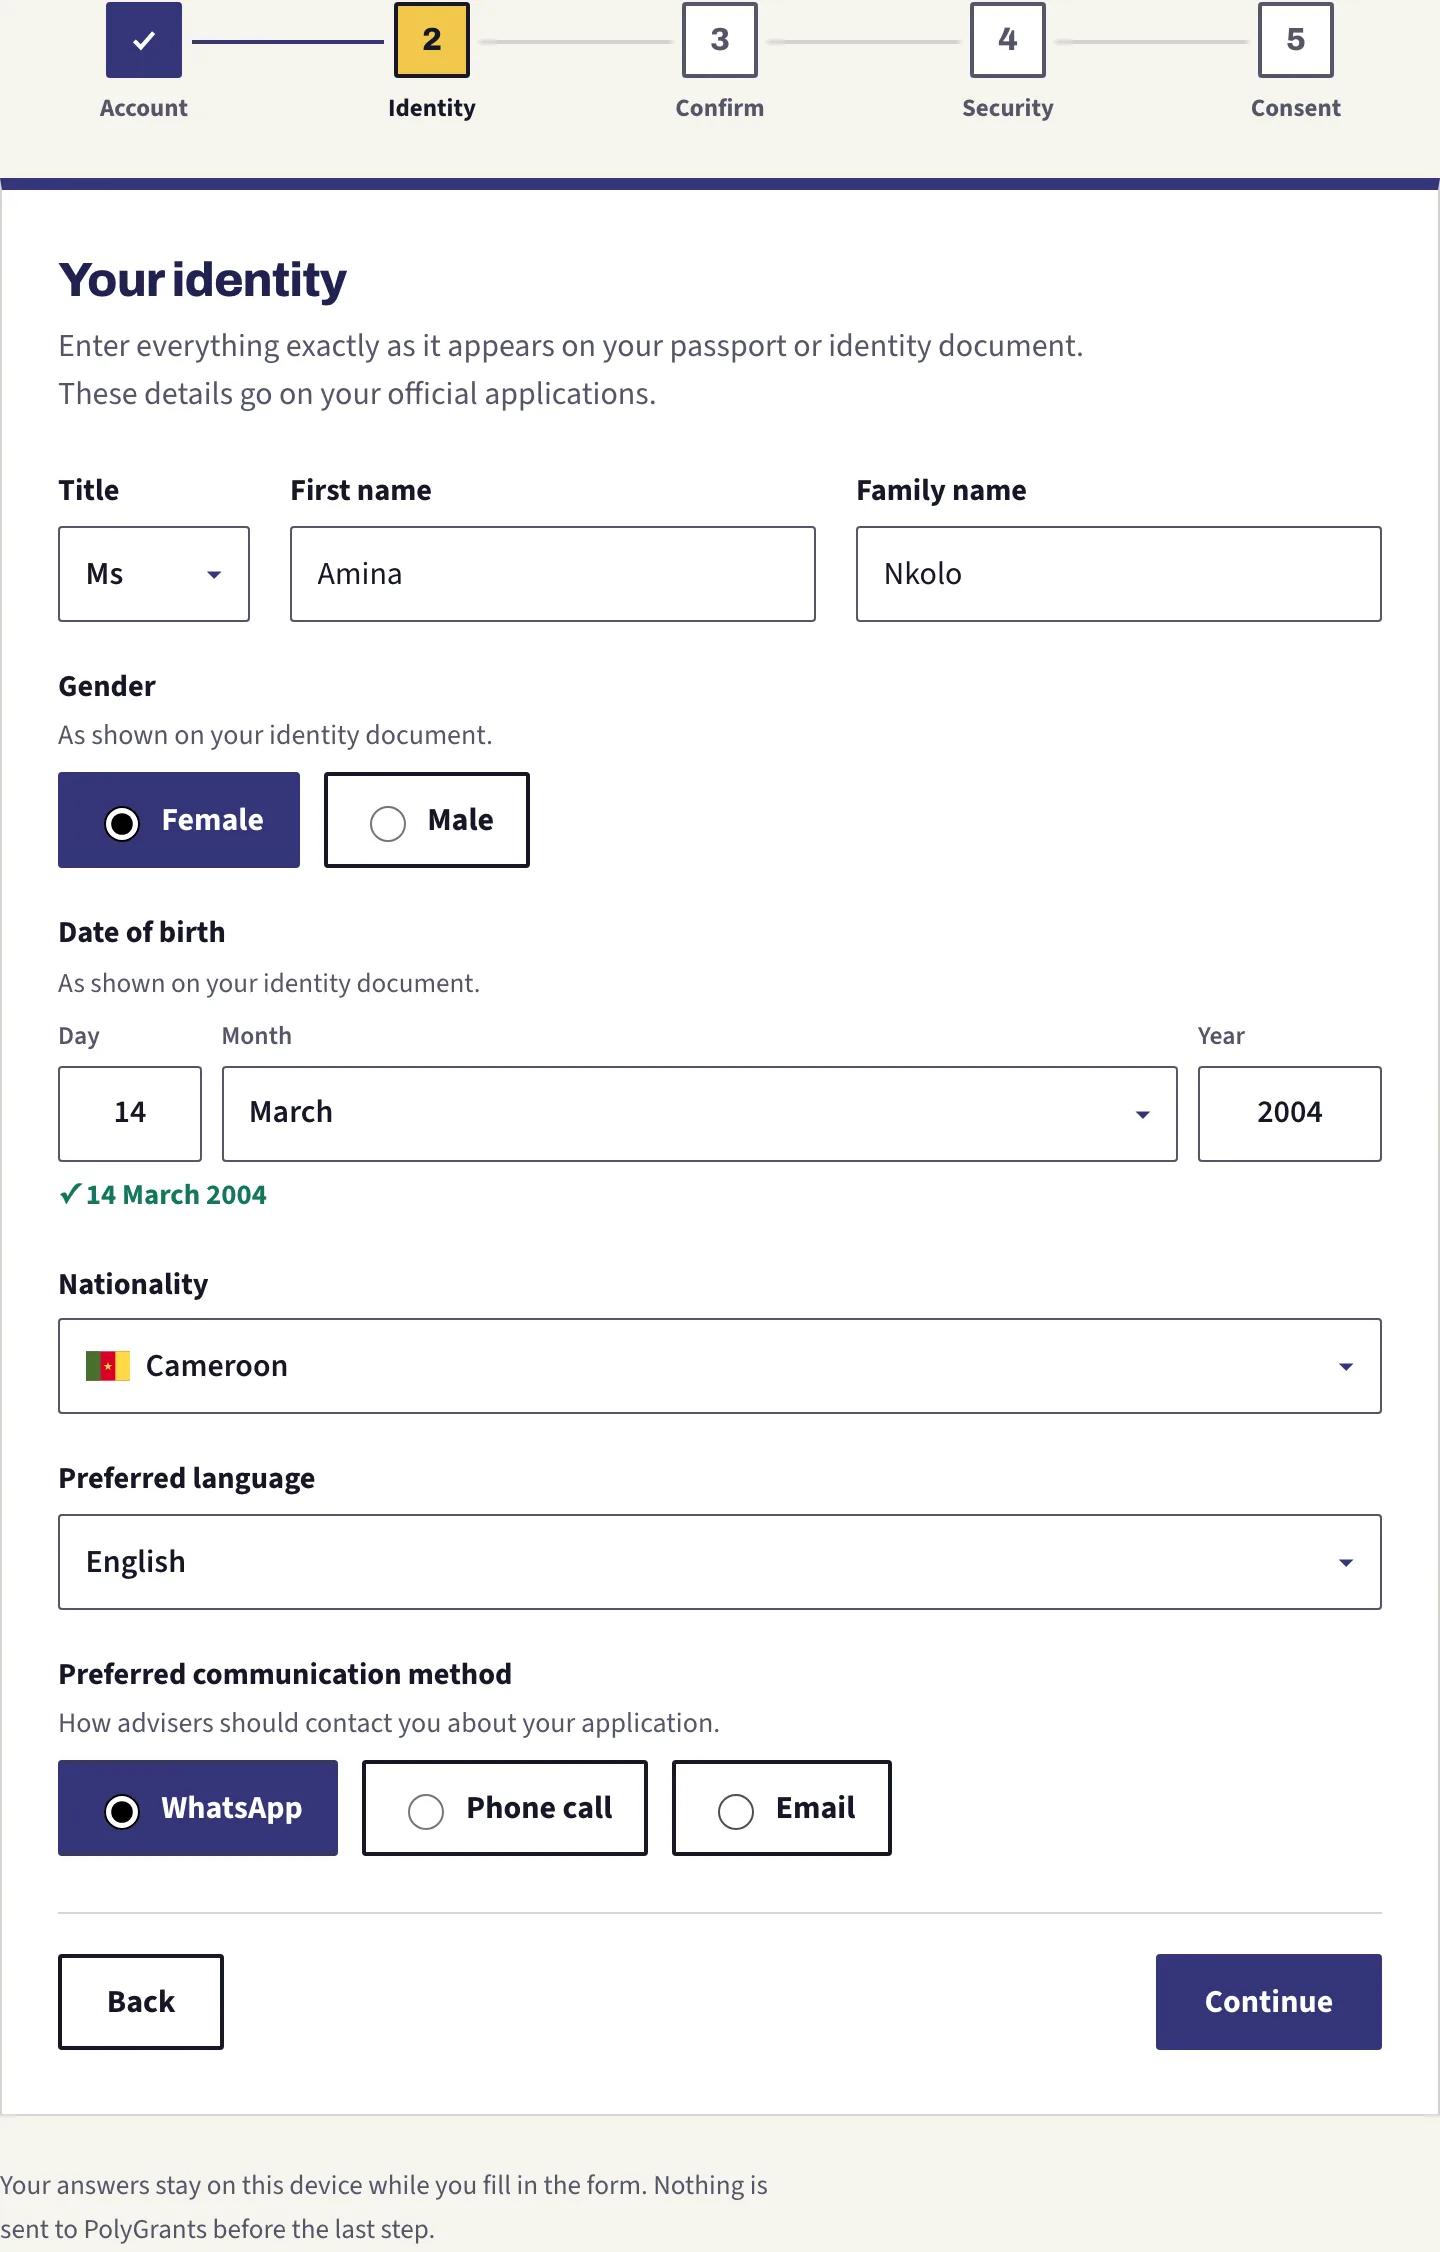
Choose your title, then type your first name and your family name as your document spells them. Choose your gender as it appears on that same document, then your date of birth and your nationality.
Two smaller questions sit at the bottom. Preferred language is the language your adviser will write to you in. Preferred contact method is how they will reach you first. Both of these you can change later, so do not agonise over them.
You must be at least sixteen years old to create an account. Between sixteen and eighteen, a parent or guardian will need to agree.
Step 3 of 5: the screen you cannot undo
Read this one slowly. It shows you everything you typed and splits it into two groups, and the difference between those groups matters.
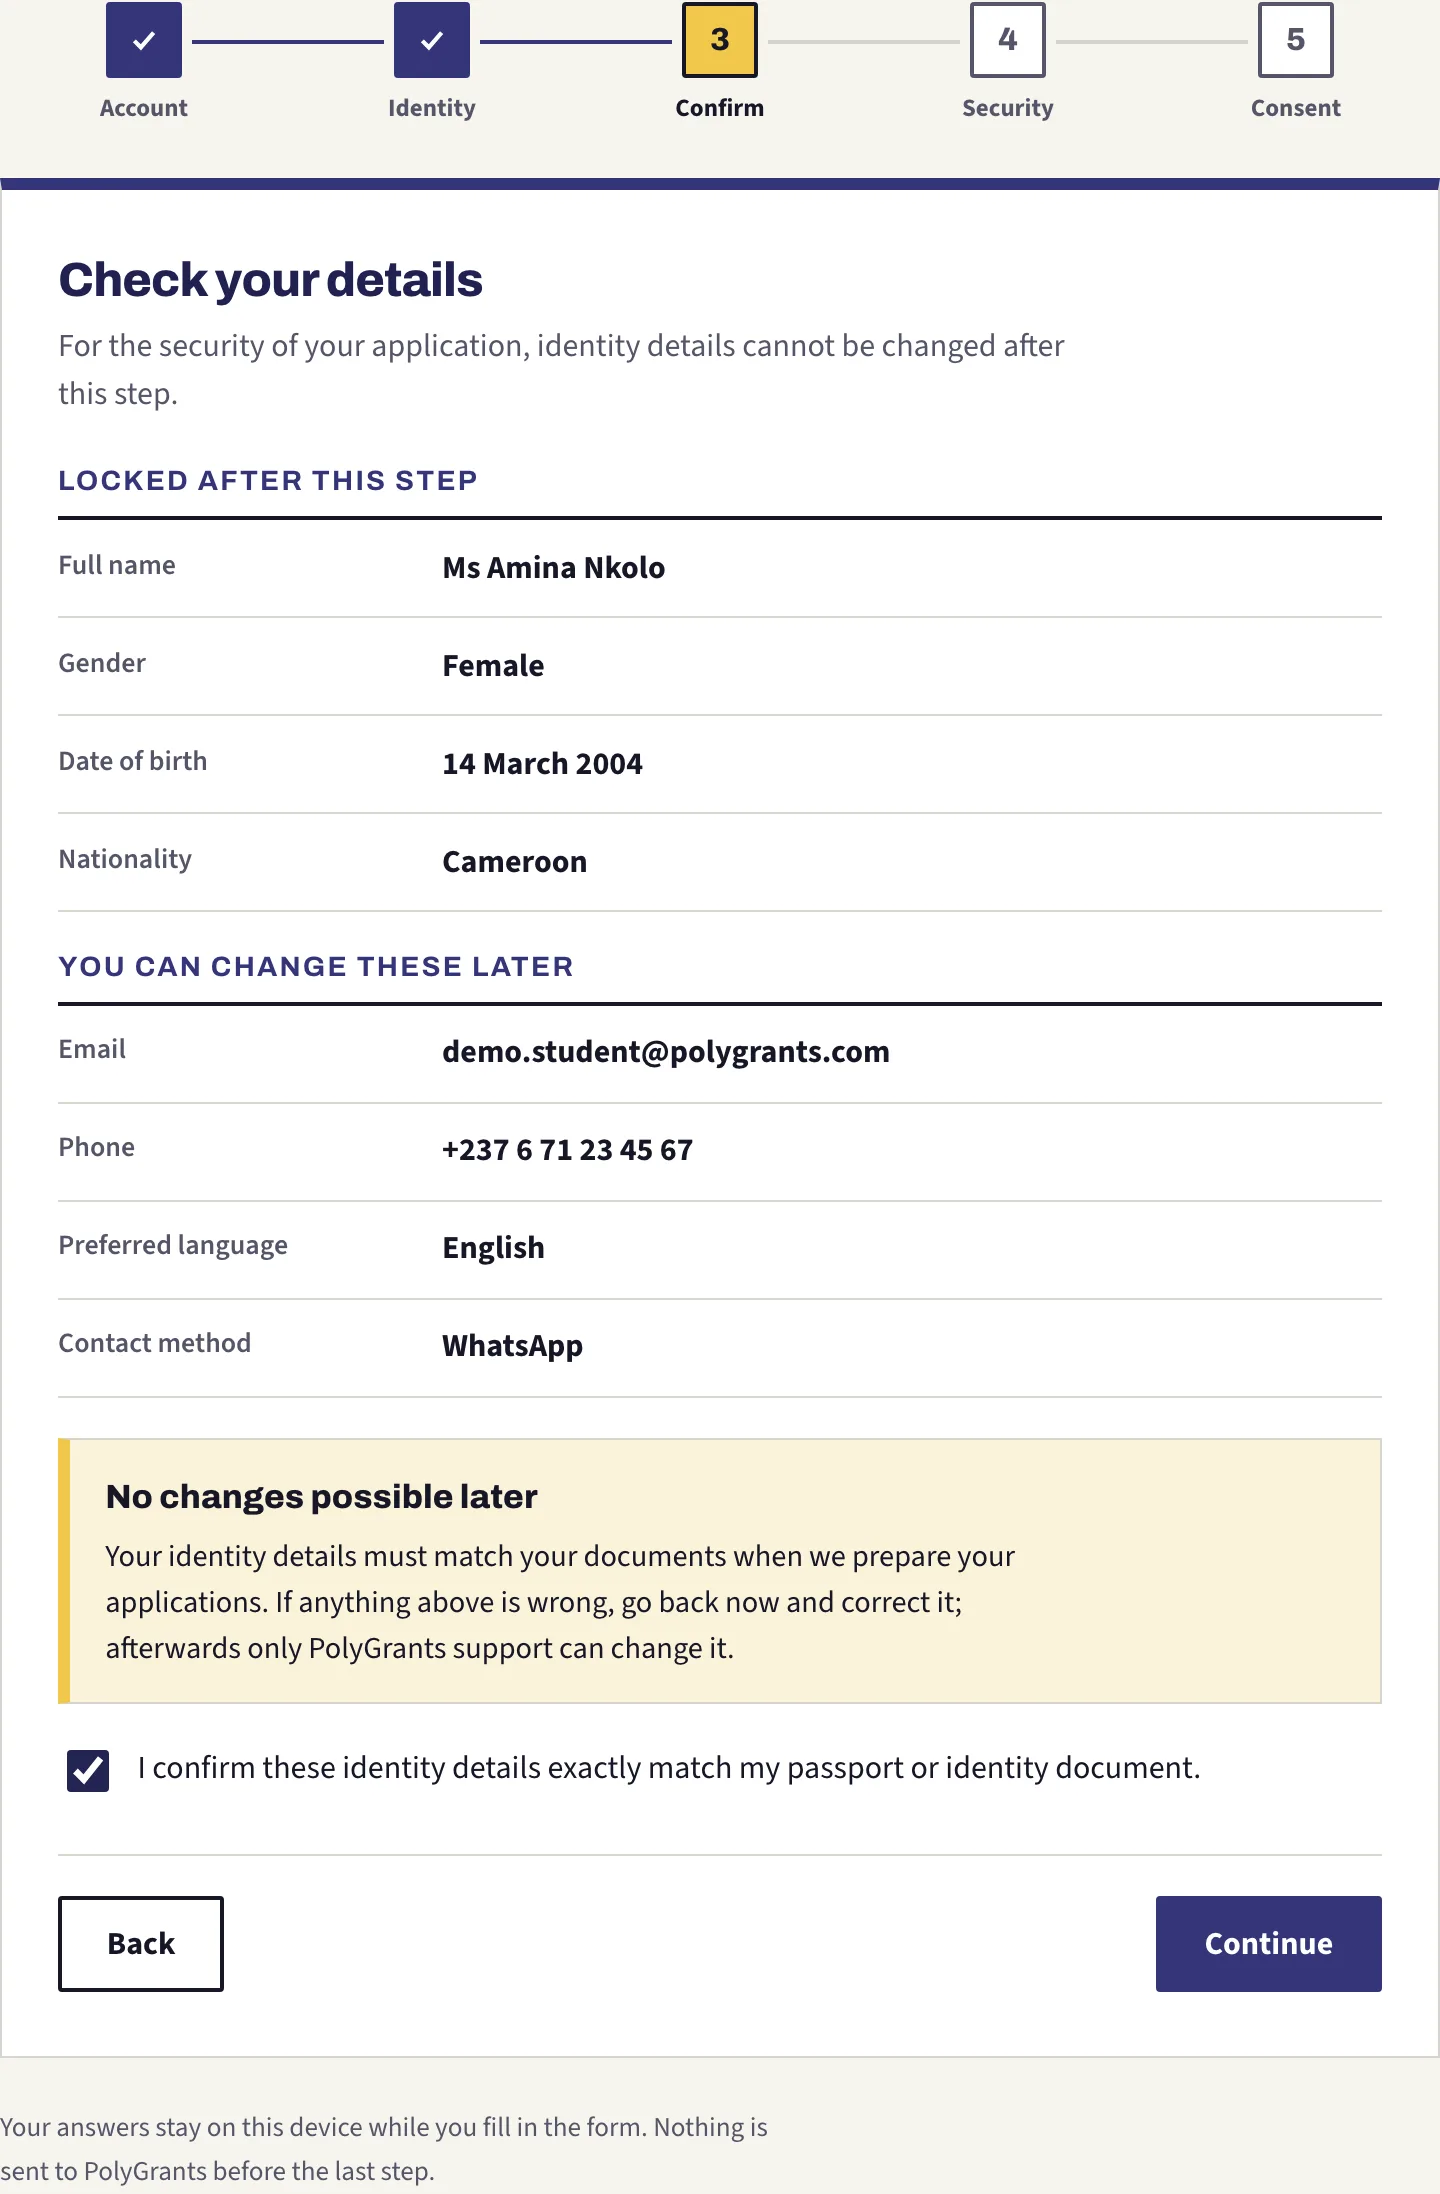
The top group locks. Your full name, your gender, your date of birth and your nationality cannot be changed after this step, not by you and not by your adviser: only PolyGrants support can change them. The bottom group, your email, phone, language and contact method, stays editable in your settings.
So if anything in the top group is wrong, press Back now. Correcting it here takes ten seconds. Correcting it later takes a support request and a copy of your document.
See how the whole process works
Step 4 of 5: three things about money
No fields on this screen, only three notices. They are there because people do pretend to be us, and students do get cheated.
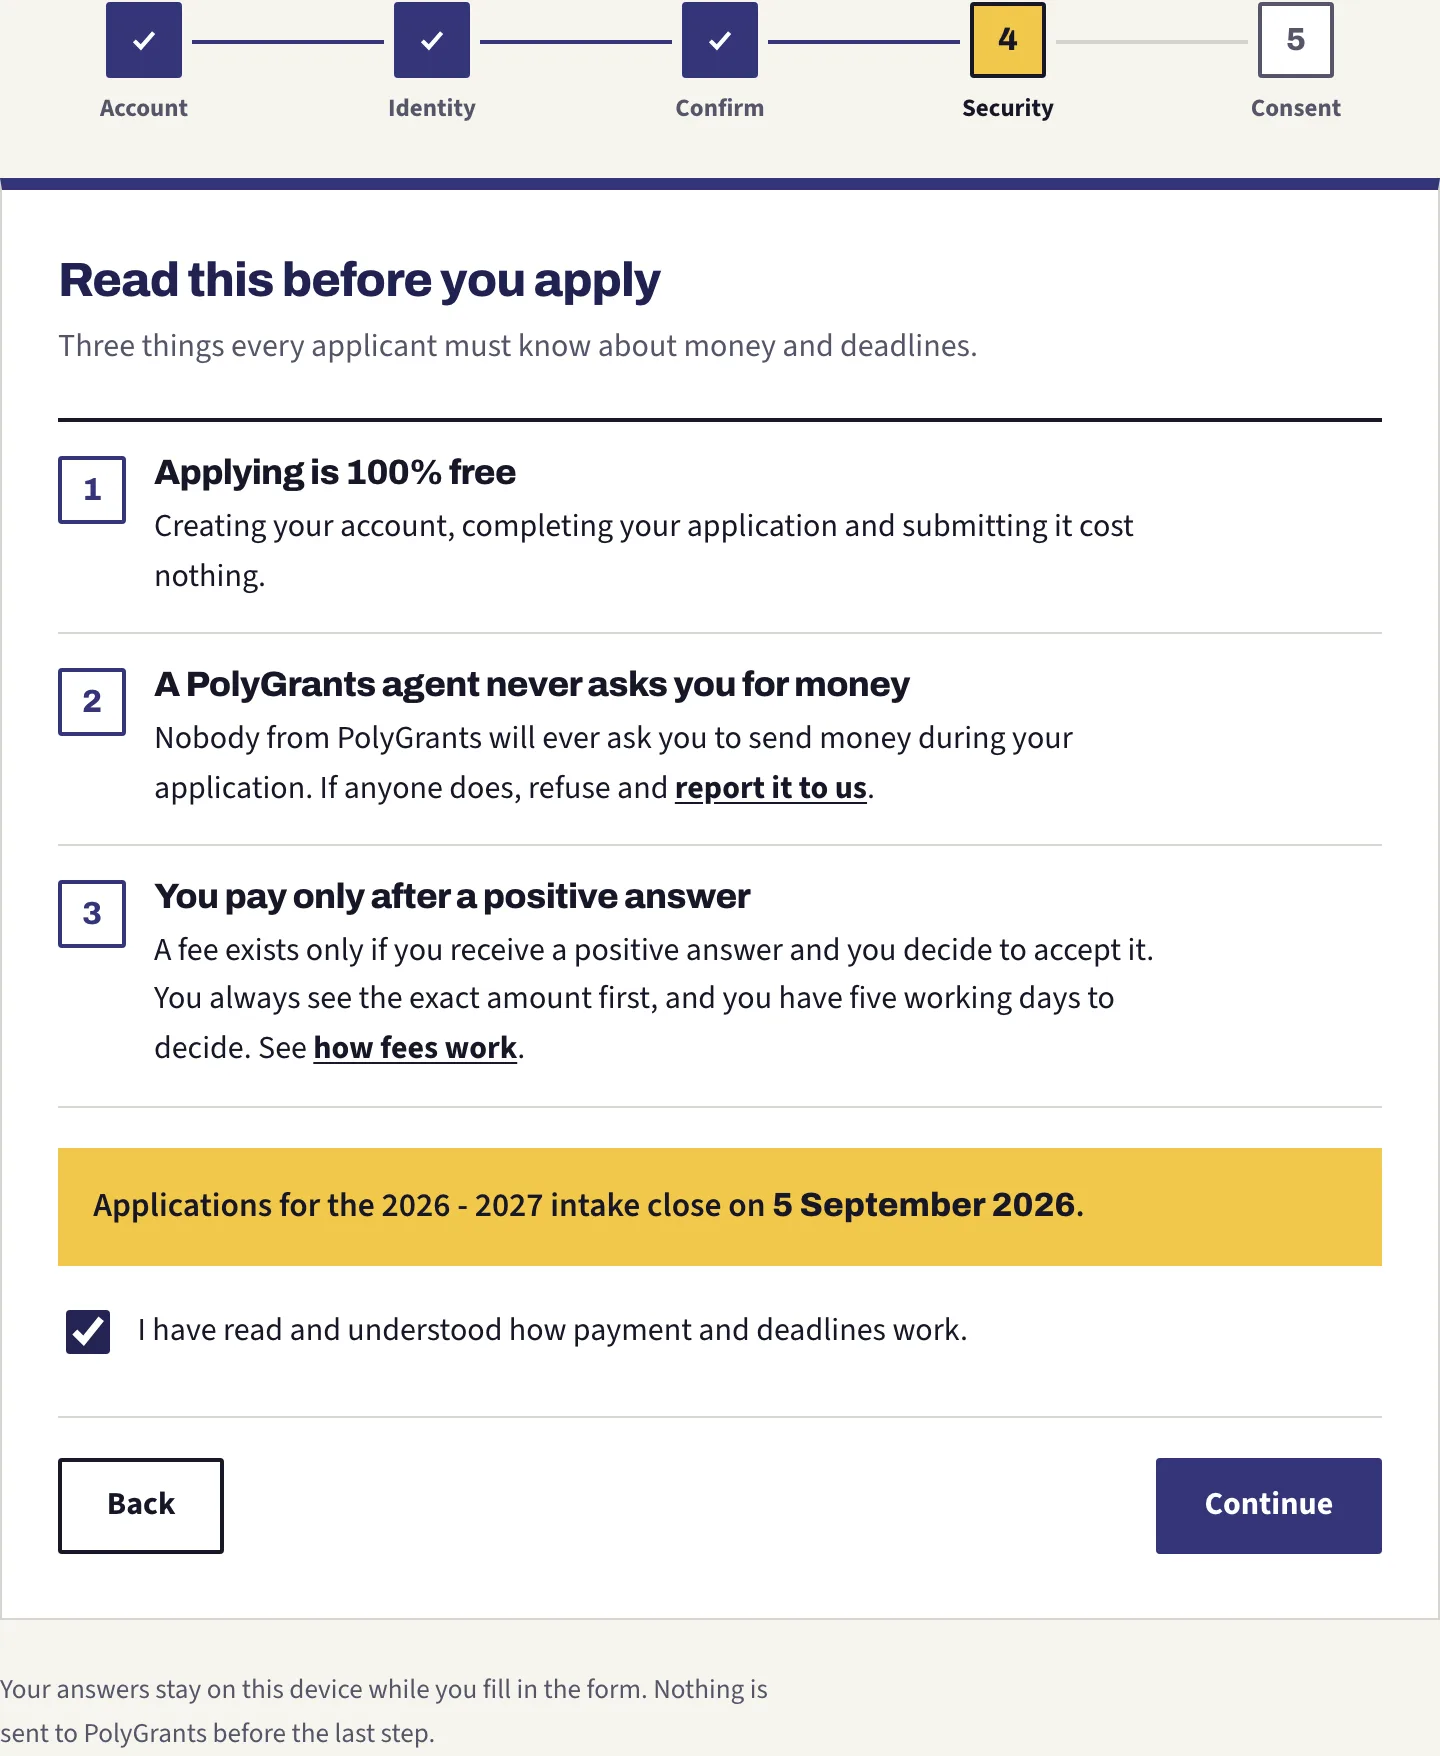
Creating your account, filling in your application and sending it all cost nothing. An agent will never ask you for money. You pay only after a positive answer that you have decided to accept, and you see the amount before you decide anything.
Step 5 of 5: terms and permissions
Three boxes you must tick, and one you can leave empty.
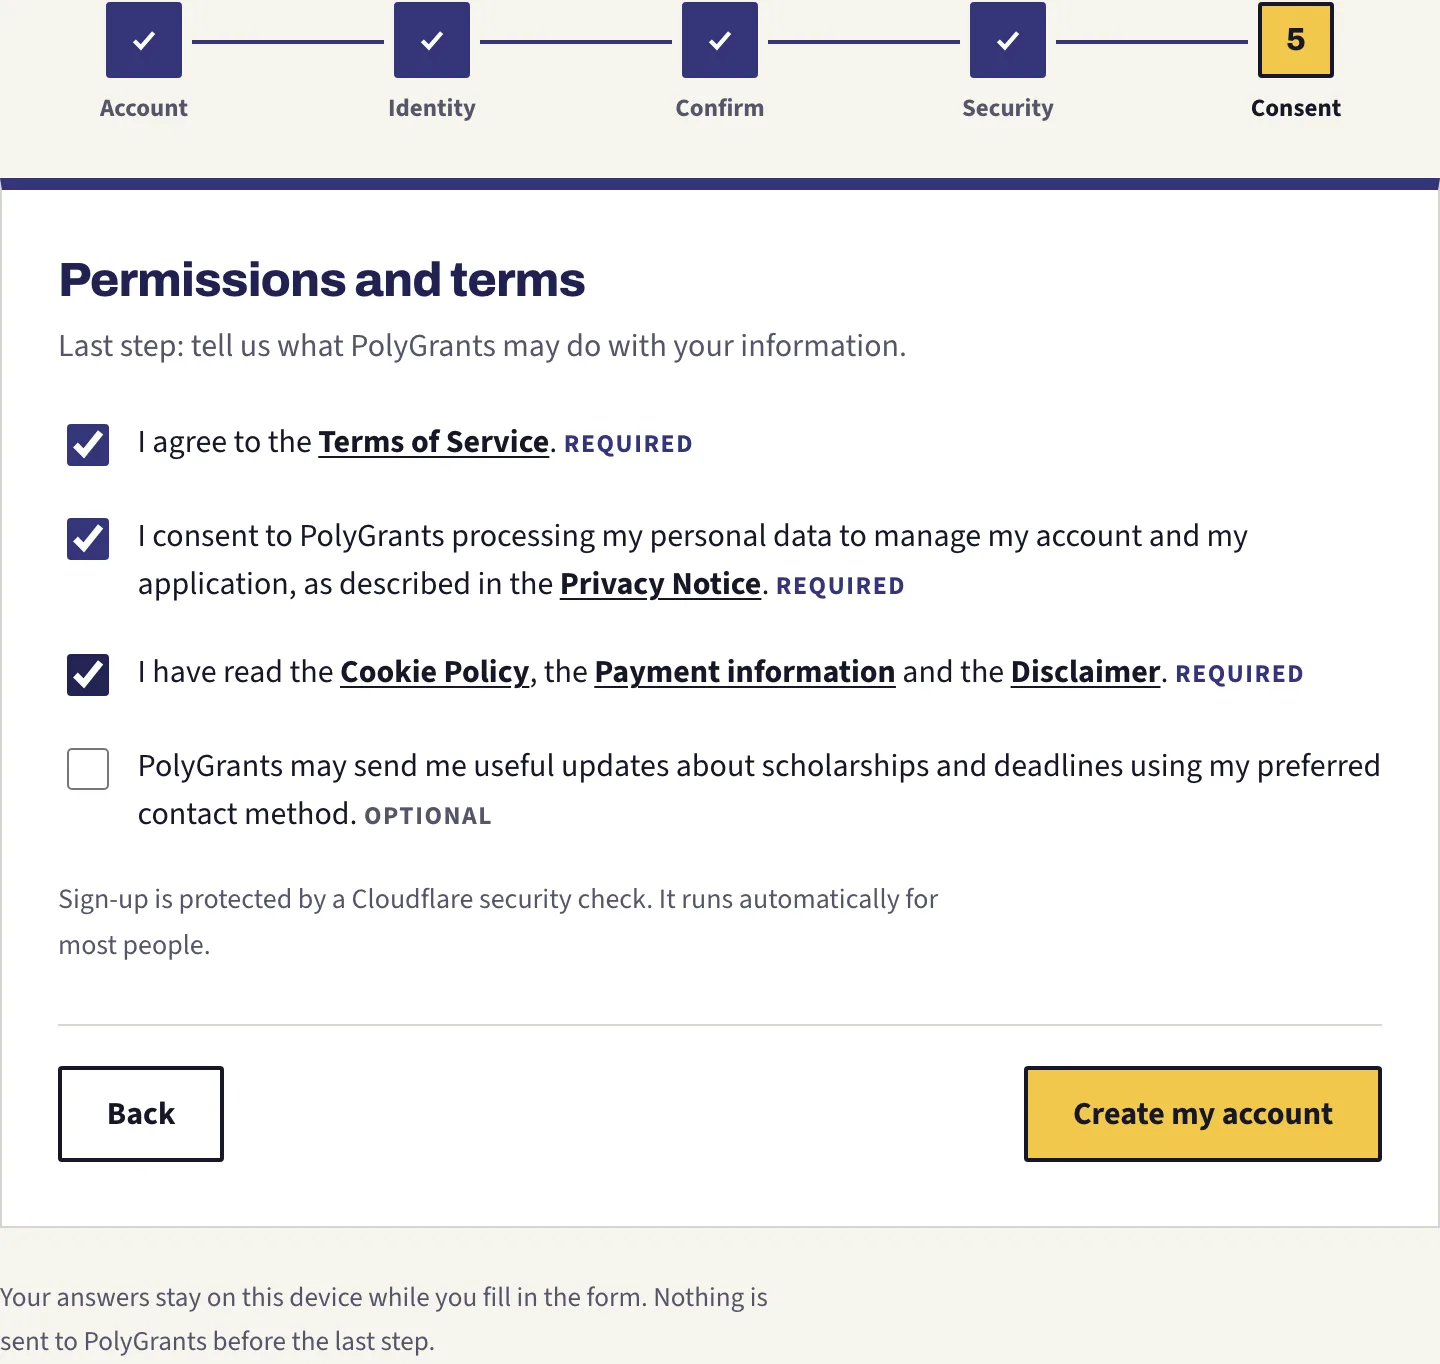
The three required boxes cover the Terms of Service, your permission for us to handle your personal data, and the cookie, payment and disclaimer pages. The fourth box, about useful updates on scholarships and deadlines, is optional and changes nothing about your application.
Then press Create my account. A short automatic security check may run first; for most people it passes on its own and you will barely notice it.
Your account exists. Two codes to go
The screen changes and your account is real. Two checks remain, and they are not the same check, which is where people get confused.
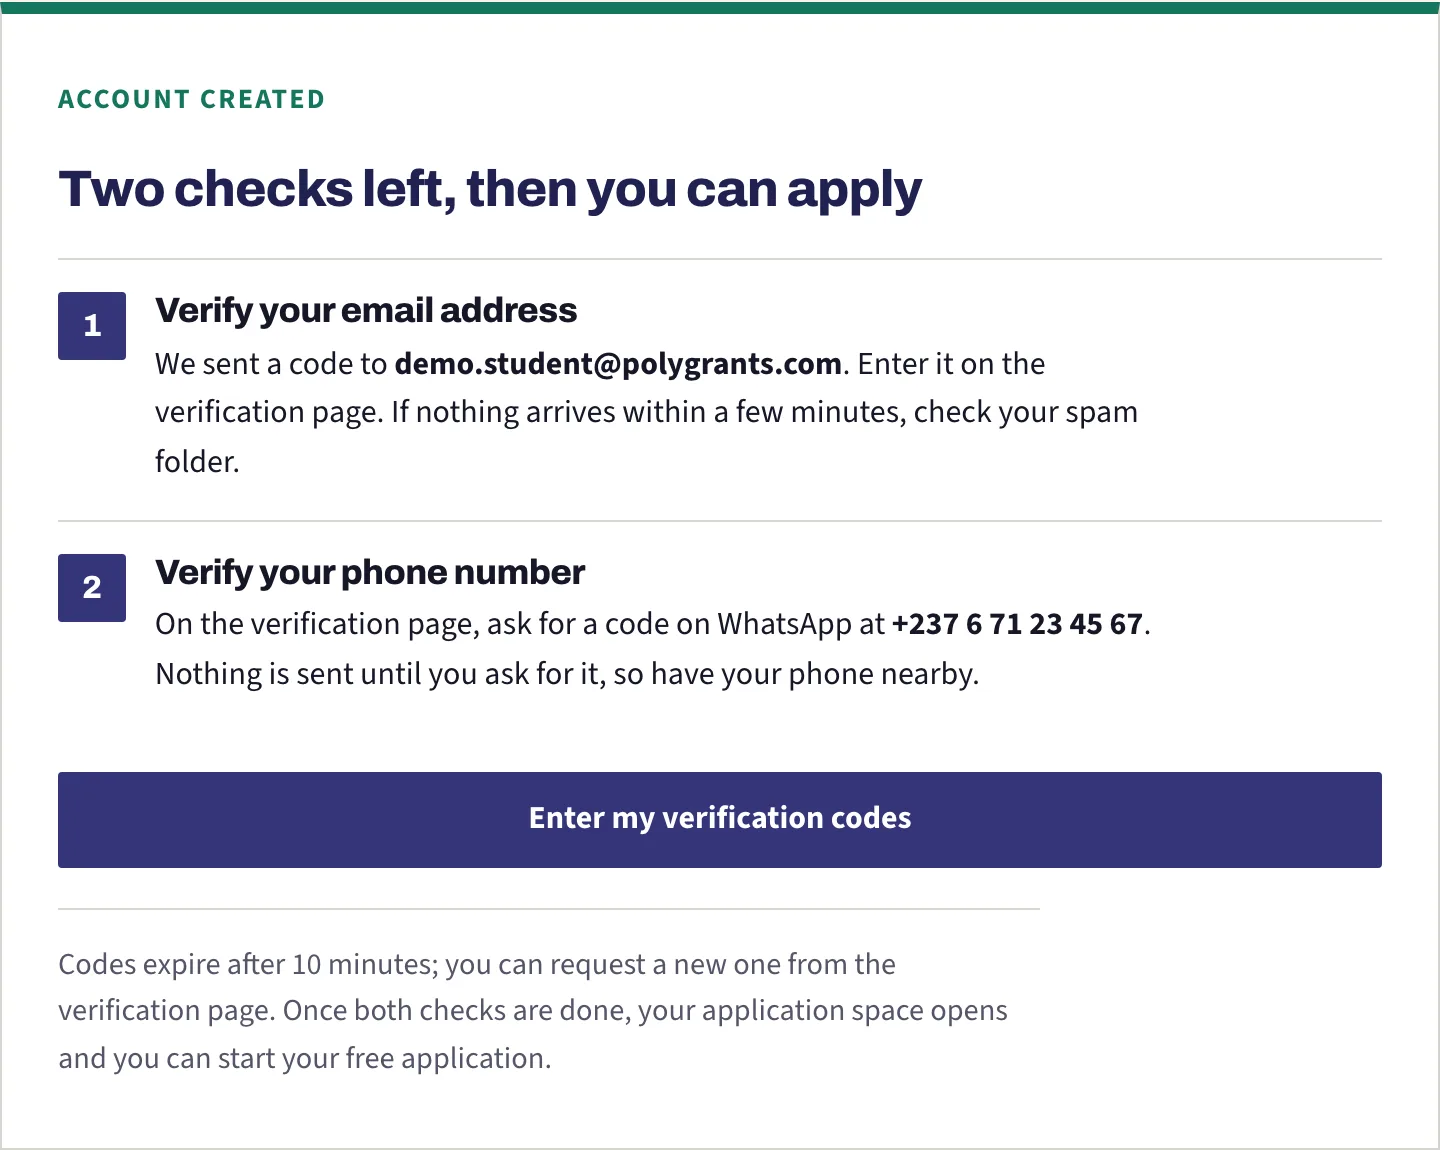
An eight-digit code is already travelling to your email. Nothing has gone to your phone yet: you ask for that one yourself, on the verification page, when you are ready.
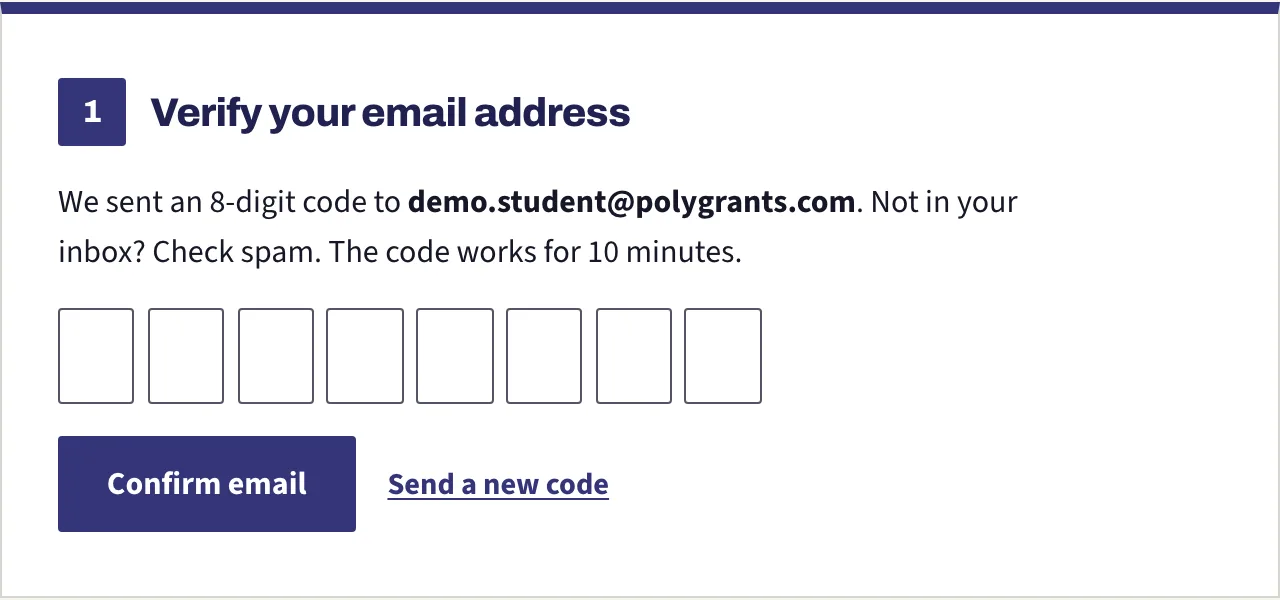
Type the eight digits from the email into the eight boxes. That code works for ten minutes. If nothing has arrived after a few minutes, look in your spam folder before you ask for another, and remember that asking for a new code stops the old one from working.
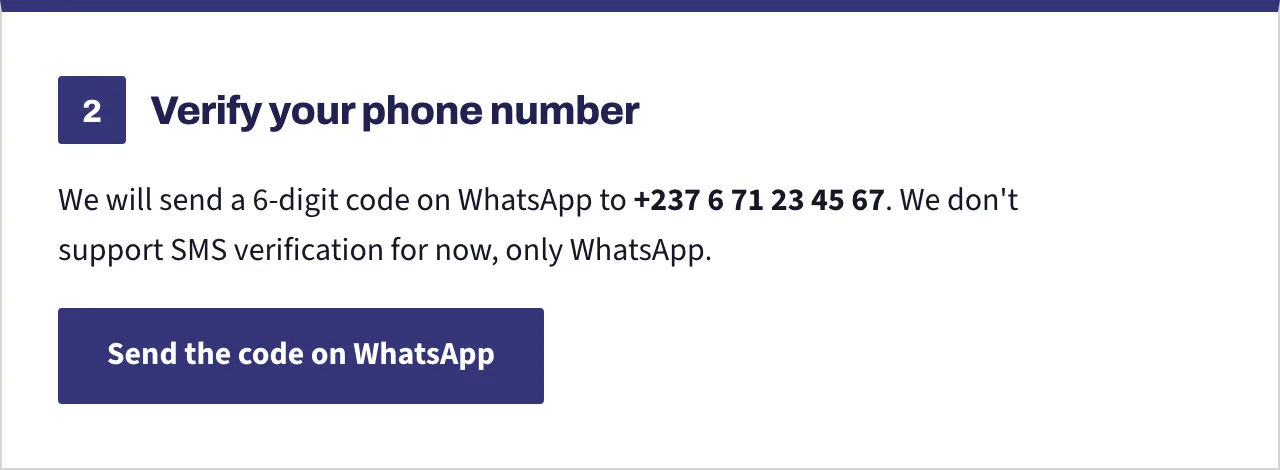
Lower down the same page sits the phone check. Press the button and a six-digit code arrives on WhatsApp. Six digits this time, not eight, and it expires after ten minutes too. WhatsApp is the only channel for it: this code is never sent by SMS.
Both buttons make you wait sixty seconds before you can ask again. That wait is normal and it is not an error.
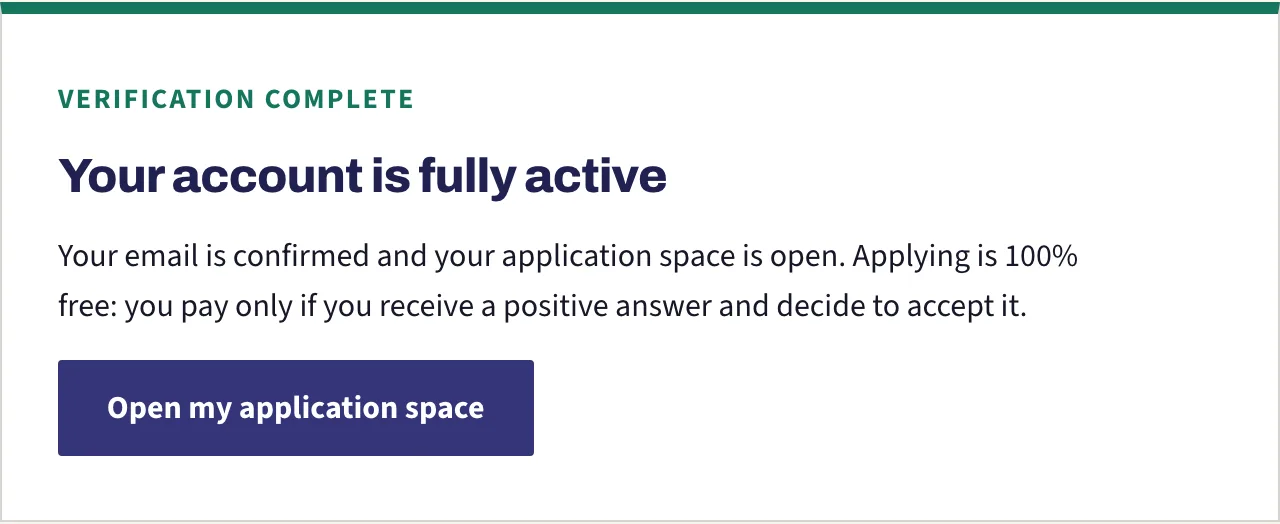
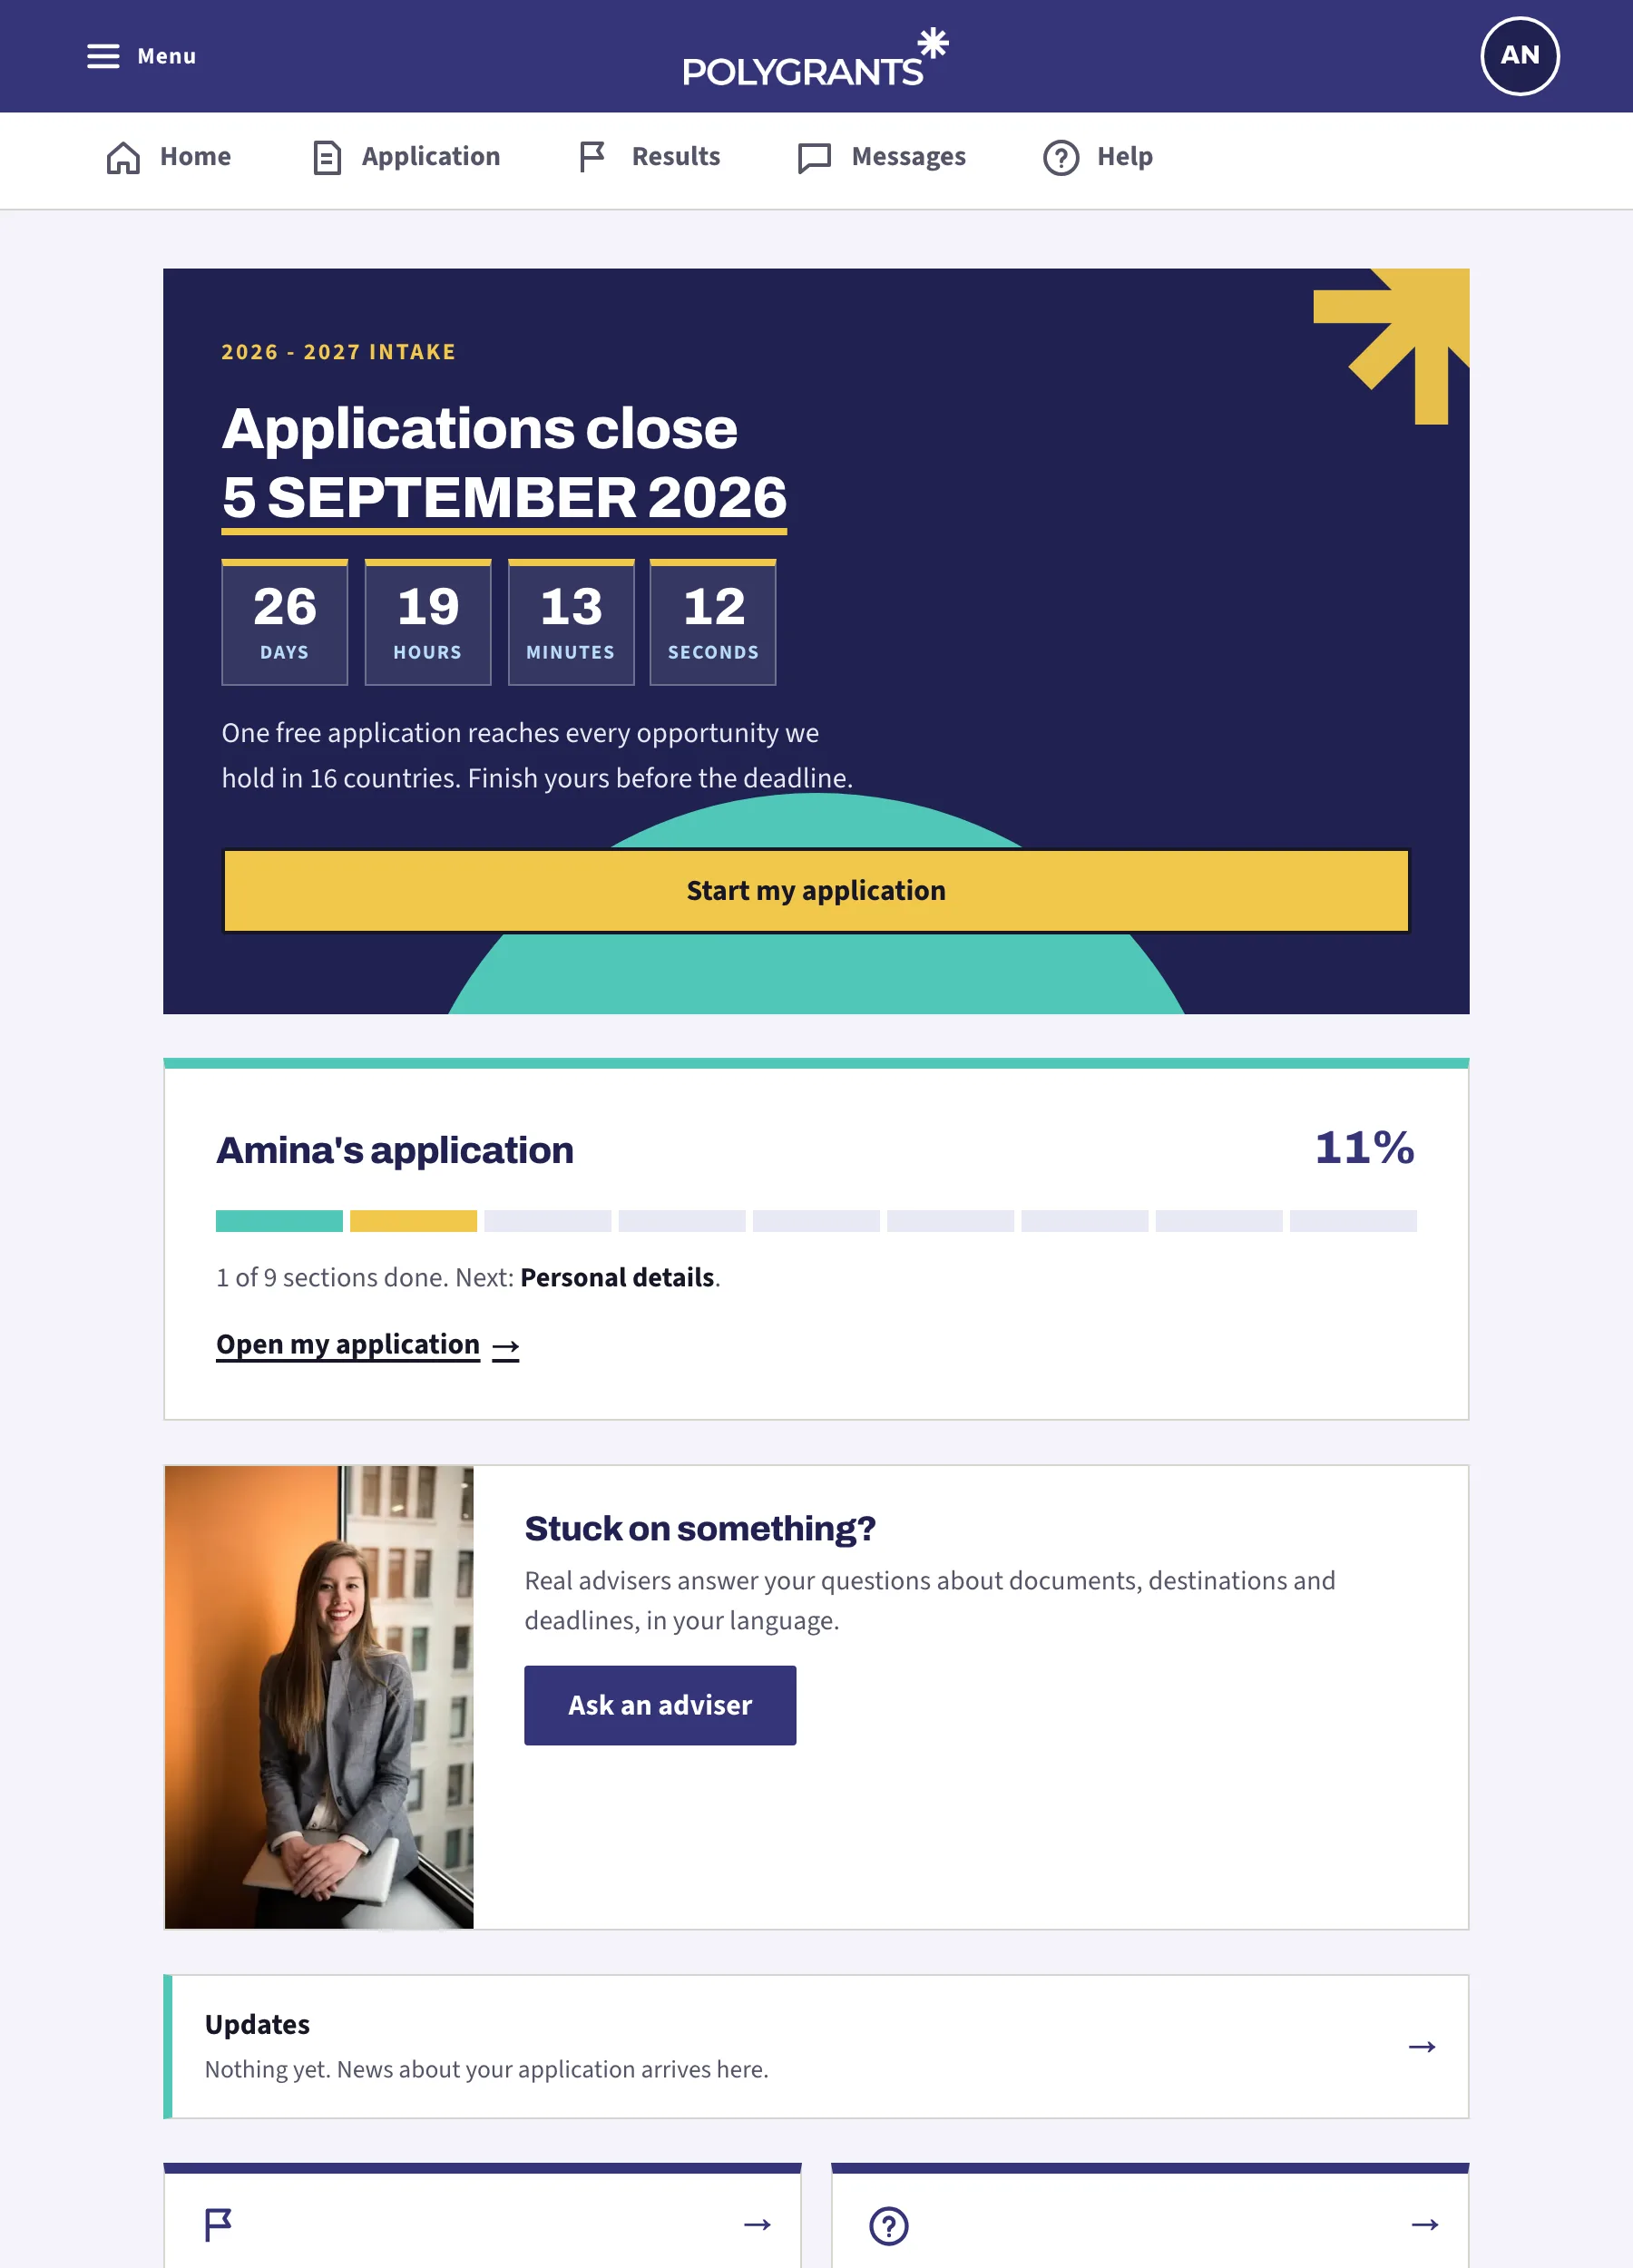
When the checks pass, this card appears and the button below it opens your application space.
Frequently asked questions
How long does this really take?
About five minutes for the account itself, plus a minute or two for the two codes. The application that follows is longer, and you do not have to finish it in one sitting.
Does creating an account cost anything?
No. Creating the account is free, filling the application is free, and sending it is free. You pay only if you receive an offer and decide to accept it, and you are shown the amount before you decide.
I do not have my passport yet. Can I still start?
Yes, you can create the account with a national identity document. What matters is that the name, date of birth and nationality you type match the document you will actually use for your applications.
The email code never arrived. What should I do?
Check your spam folder first, then check that you typed your address correctly on step 1. If it is still missing, ask for a new code from the verification page. The button waits sixty seconds between tries.
I spelled my name wrong and I have already passed step 3. What now?
Contact support and ask for a correction, and expect to show a copy of the document with the correct spelling. This is exactly why step 3 asks you to read the summary before you tick the box.
Can I do all of this on a phone?
Yes. Every screen in this guide works on a phone, and most students use one. Your answers stay on that phone until the last step, so you can stop halfway and come back later.
آمادهاید گزینههای خودتان را ببینید؟
ساختن درخواست PolyGrants شما 100% رایگان است. تنها اگر ما برای شما پاسخ مثبتی بگیریم و شما تصمیم بگیرید آن را بپذیرید پرداخت میکنید.
شروع درخواست من